
The boons Merchant Tablet is a lightweight, touchscreen device designed to help you manage your store efficiently. It runs on a mobile operating system and comes with a built-in rechargeable battery. Here’s how it makes running your business easier:
1. Press and hold the power button until the tablet turns on.
2. Once the tablet is powered on it should look like this

Step 1: Open the boons Merchant App
• Tap the boons Merchant app icon
• Once open, tap the menu icon (☰) in the top-left
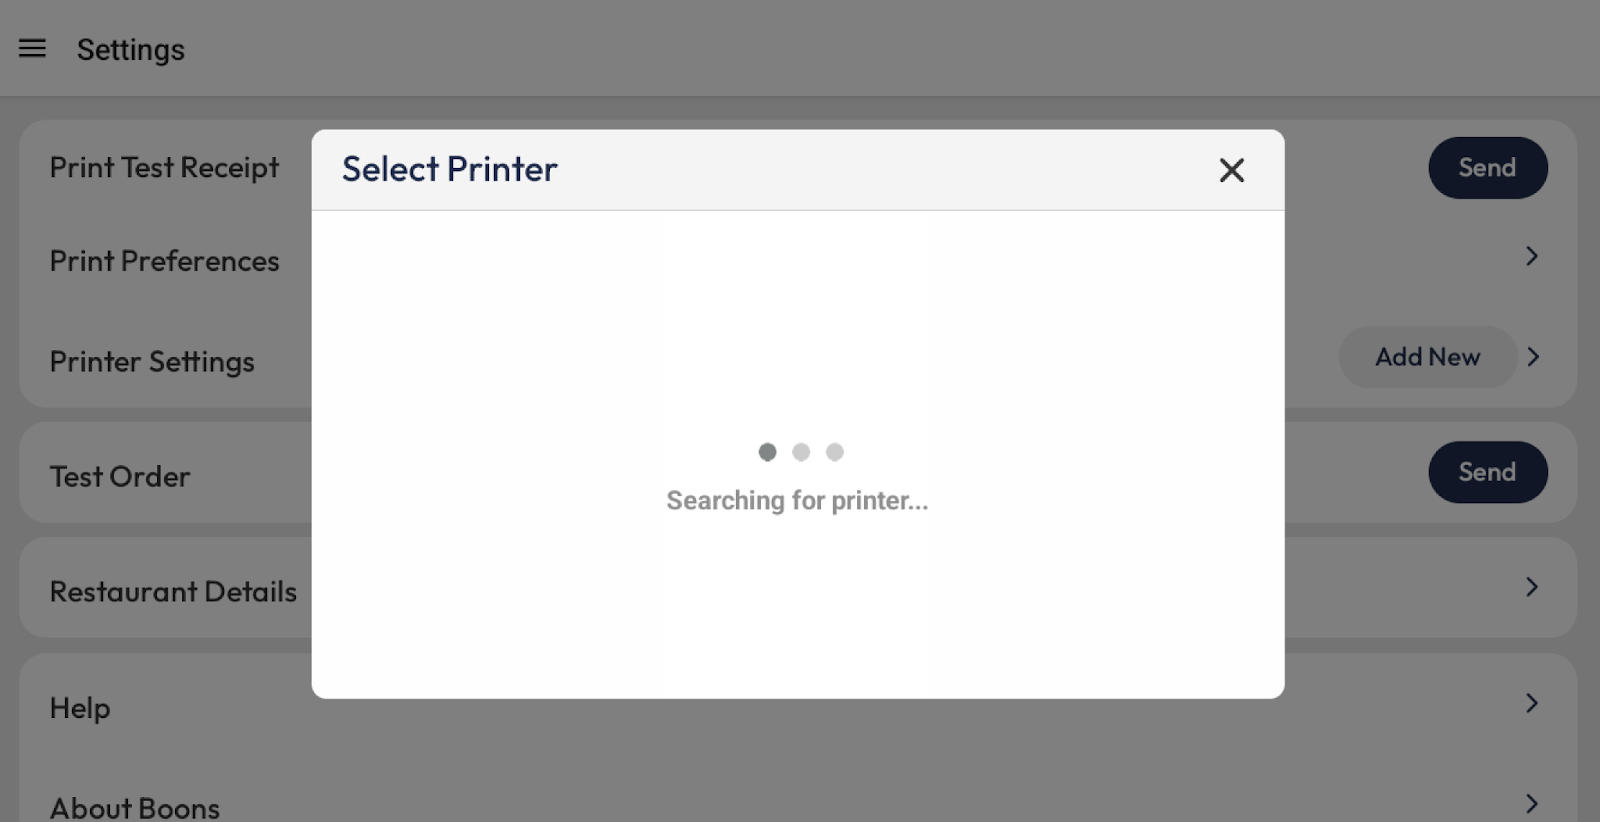
Step 2: Set Up the Printer
1. Tap on Settings in the menu
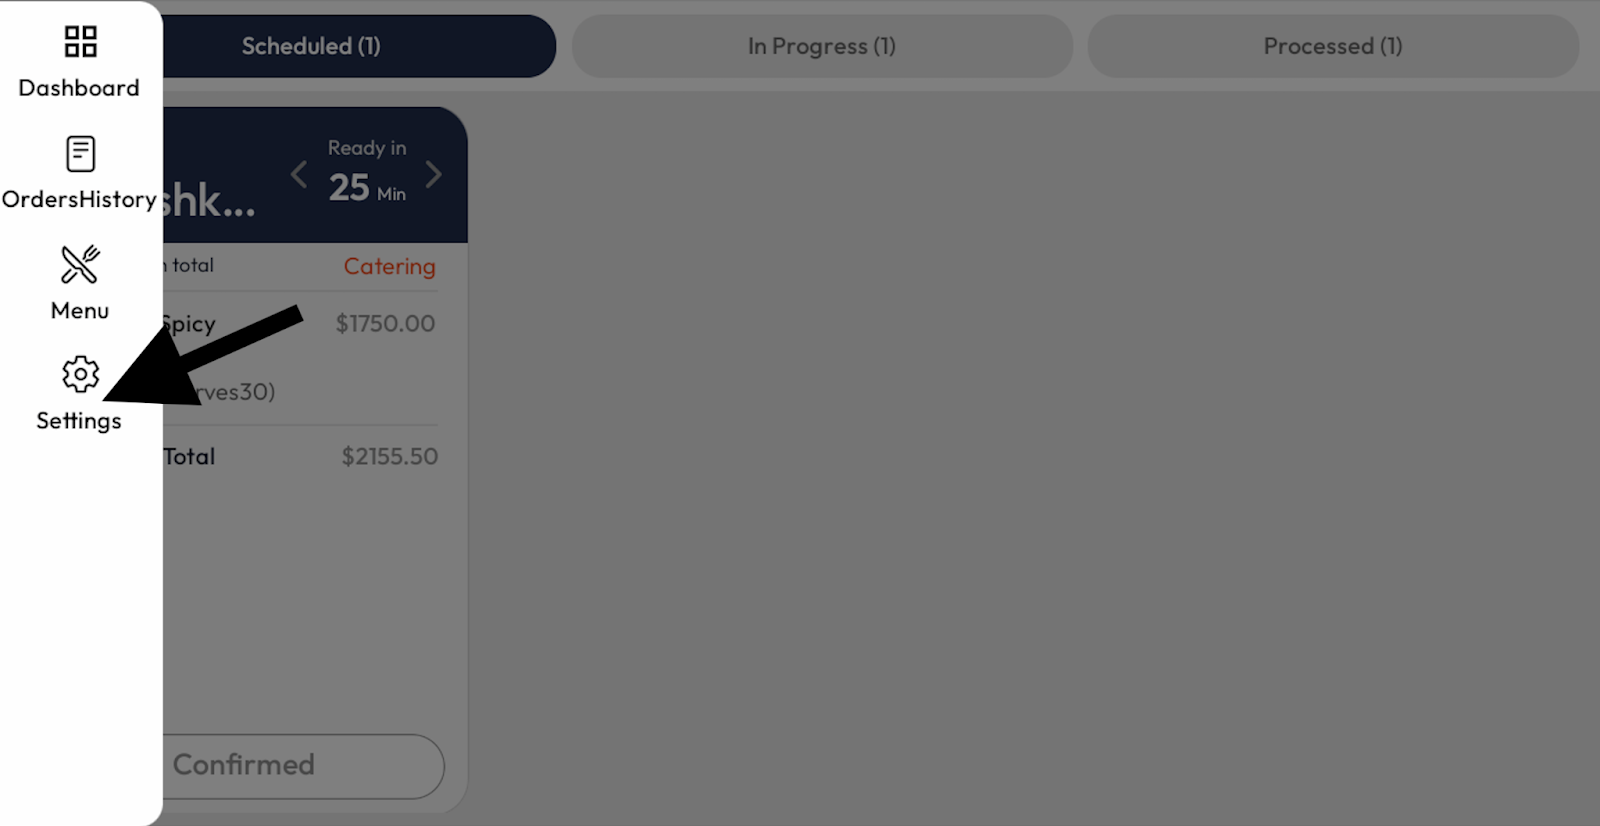

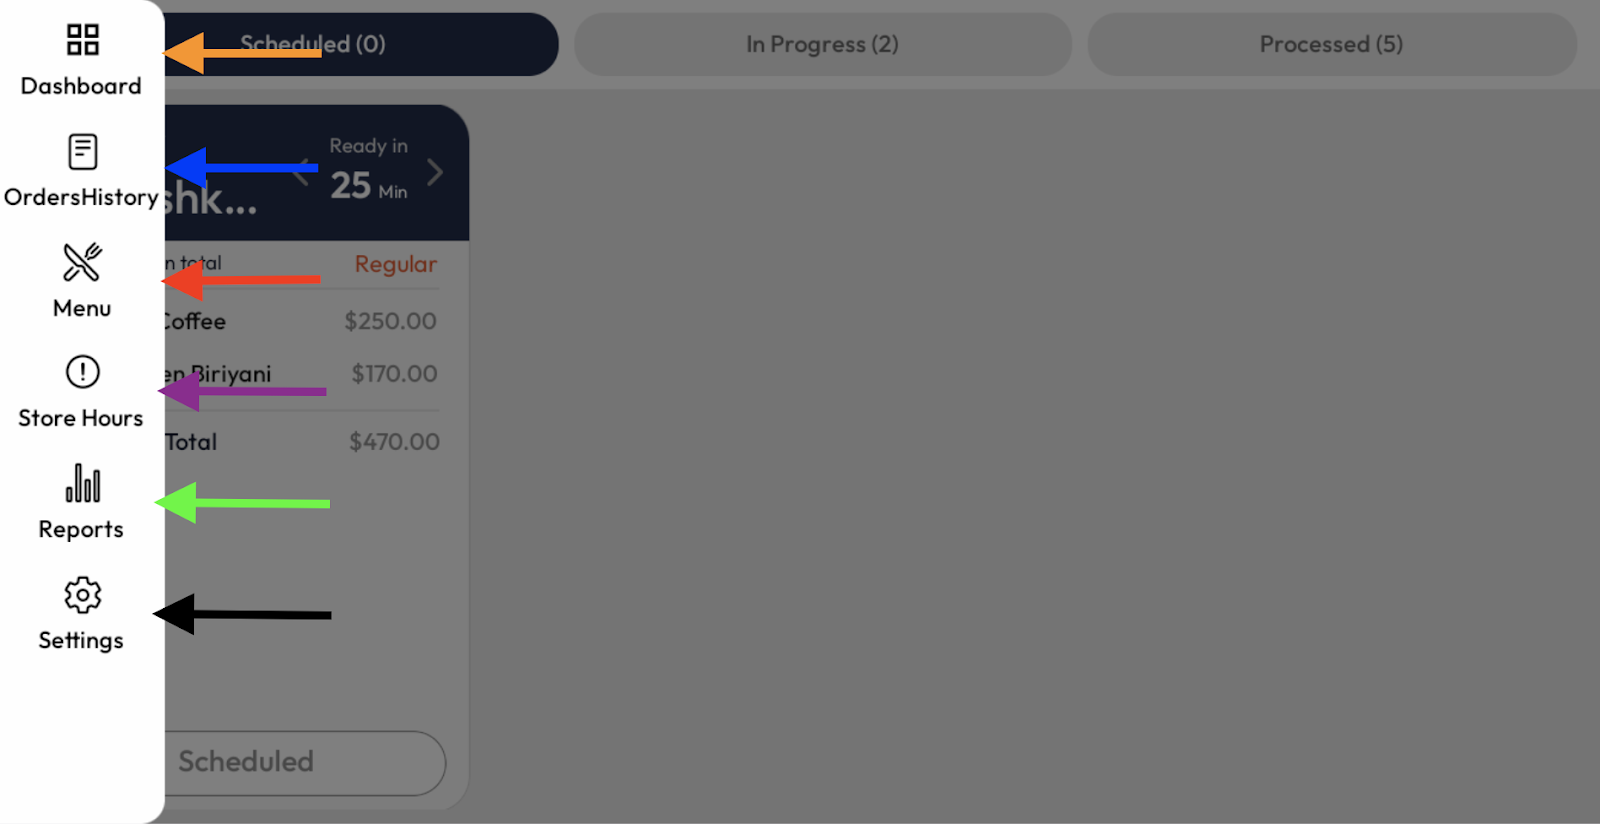
Dashboard: This is your home screen where you can view an overview of current orders and their statuses. It’s the main hub to check what’s happening in real time.
OrderHistory: Tap here to see a record of all your past orders. You can use this section to track completed orders, view customer details, or check past activity.
Menu: Use this section to manage your store’s menu. You can view listed items or temporarily disable items that are unavailable.
Store Hours: Use this section to set or adjust your business hours. You can update regular operating times, set custom closing times, or temporarily pause incoming orders.
Reports: View detailed summaries of your sales and earnings. This section shows a breakdown of all completed orders, total revenue for selected dates, and other key performance insights to help track your store’s progress over time.
Settings: This section allows you to manage printer settings, test receipts, and place test orders. You can also view restaurant details, access help resources, learn more about Boons, or log out of the app.

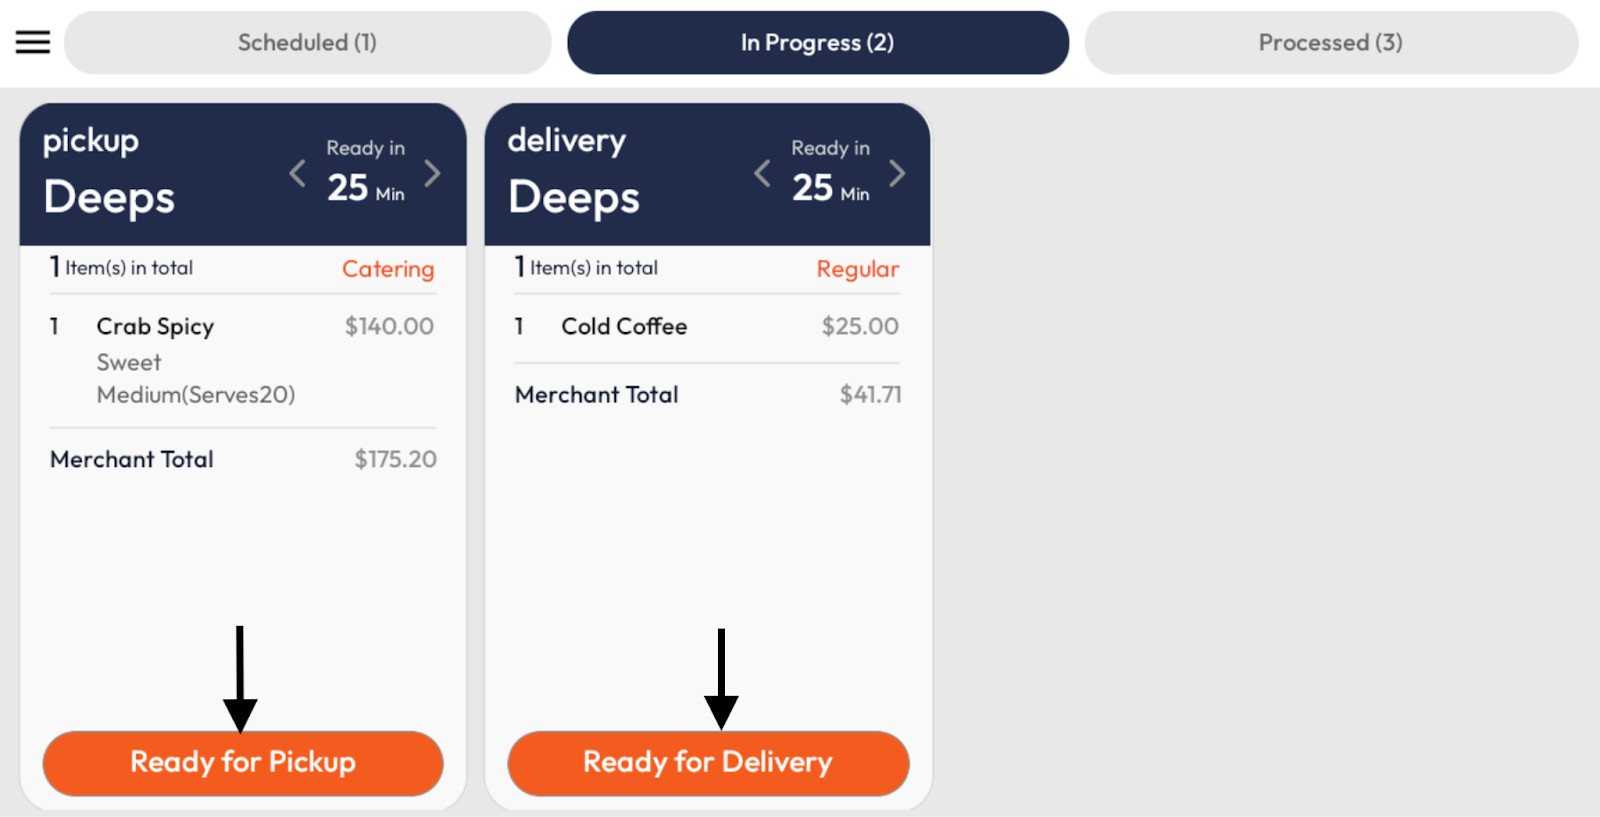
Scheduled: This tab shows upcoming orders that are scheduled for a later time. These are not yet being prepared and will appear here until their pickup or delivery time approaches.
In Progress: This section displays all active orders currently being prepared. As soon as an order is confirmed and you're working on it, it will show here.
Processed: Once an order has been completed and either picked up or delivered, it moves into the "Processed" tab. This section acts as a history of your fulfilled orders.
Numbers: The number next to each tab indicates how many orders are currently in that category.
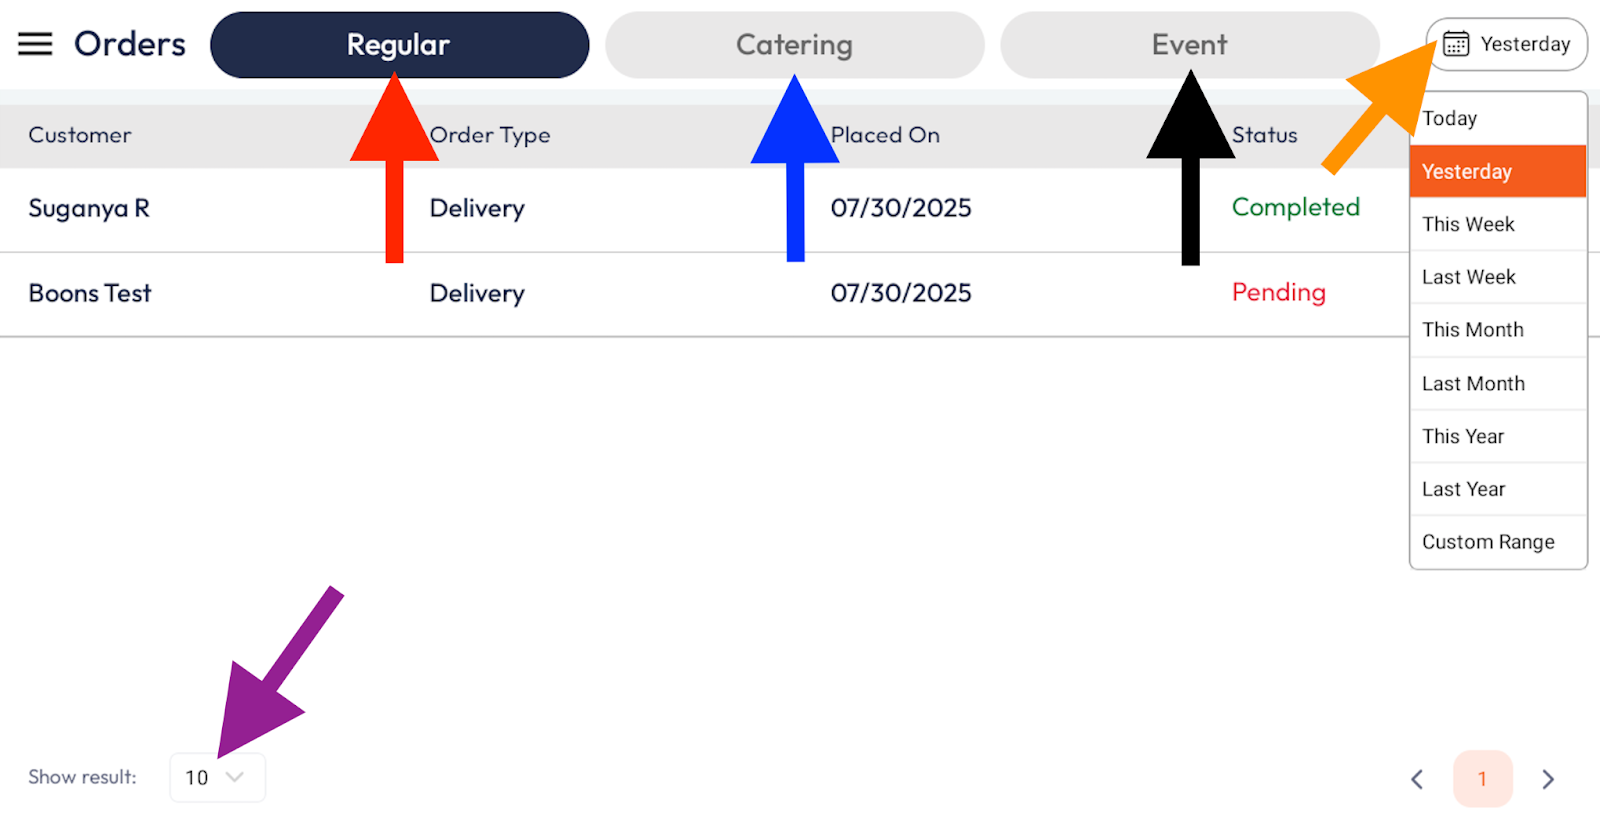
Regular:This tab displays all standard customer orders placed through the app.
Catering:Tap this tab to view bulk or large catering orders submitted by customers.
Event:This section shows any special or scheduled event orders made in advance.
Calendar: Use this dropdown to filter orders by specific timeframes such as Today, Yesterday, This Week, or set a custom date range.
Show result: This setting lets you control how many orders are displayed per page, adjust the number to see more or fewer results at once.
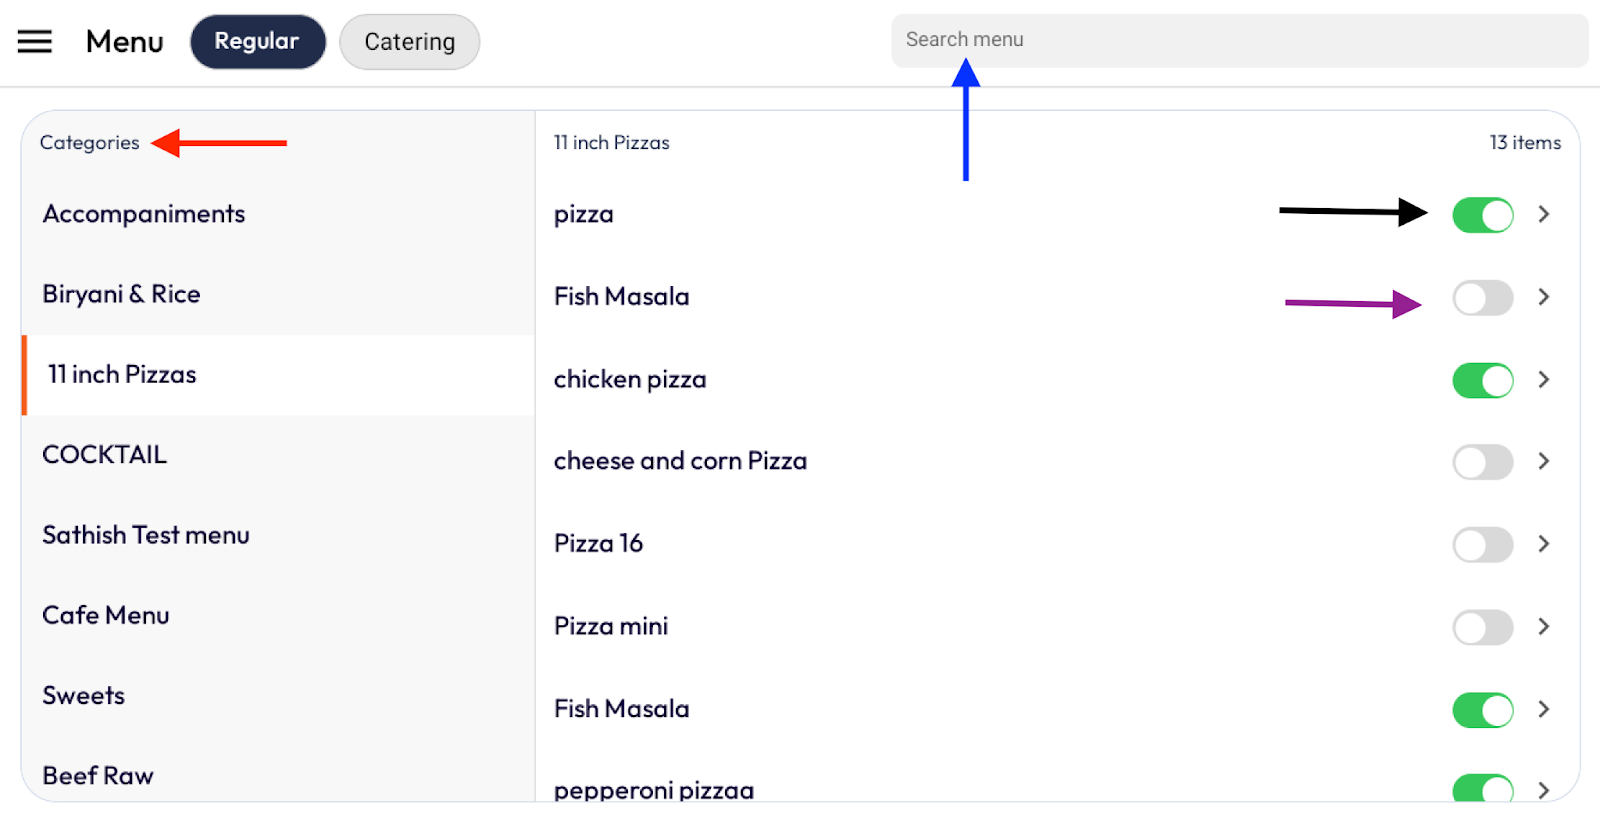
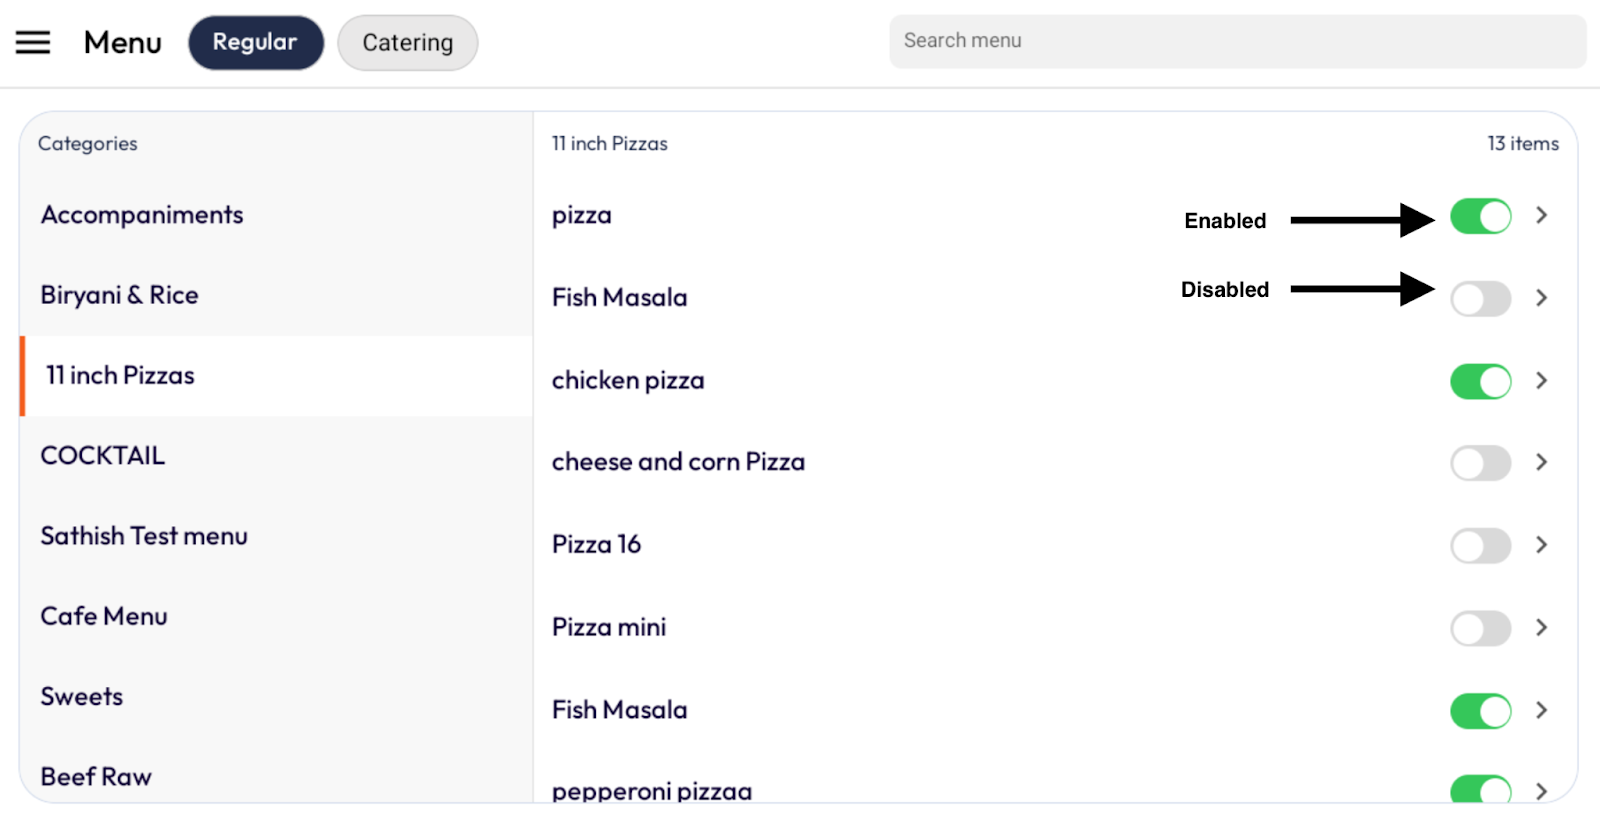
Categories:This section on the left displays all menu categories, such as Biryani & Rice, Pizzas, or Sweets. Tap a category to view and manage the items listed under it.
Search menu:Use the search bar at the top to quickly find a specific menu item by name without needing to scroll through categories.
Enable/Disable Toggle:
• Green (enabled) means the item is active and visible to customers.
• Grey (disabled) means the item is not available at this time.

Accepting Orders Toggle: Controls whether your store is currently accepting orders. Turn it off to temporarily stop new orders from coming in, and turn it back on to resume accepting them.
Hours of Operation: Drop down where you can view regular and catering business hours so customers know when you’re open.
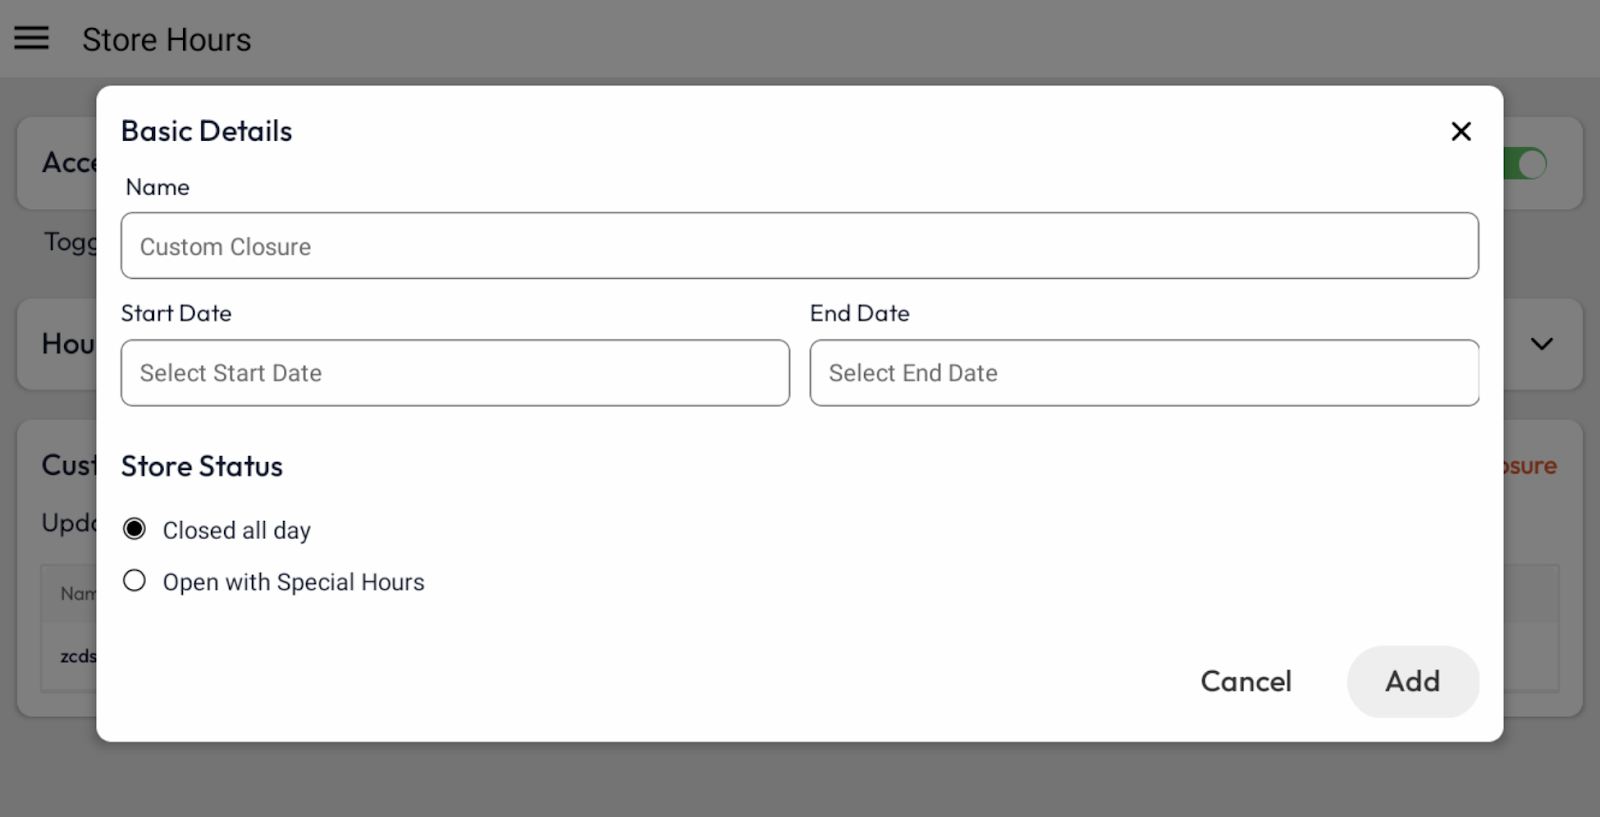
+Add Custom Closure:Lets you create a new custom closure, which is useful for setting temporary changes to your hours without affecting your regular schedule.
Custom Closure: Shows the specific date range for a custom closure that were made, letting you see exactly when your store will be closed for holidays, events, or other special situations.
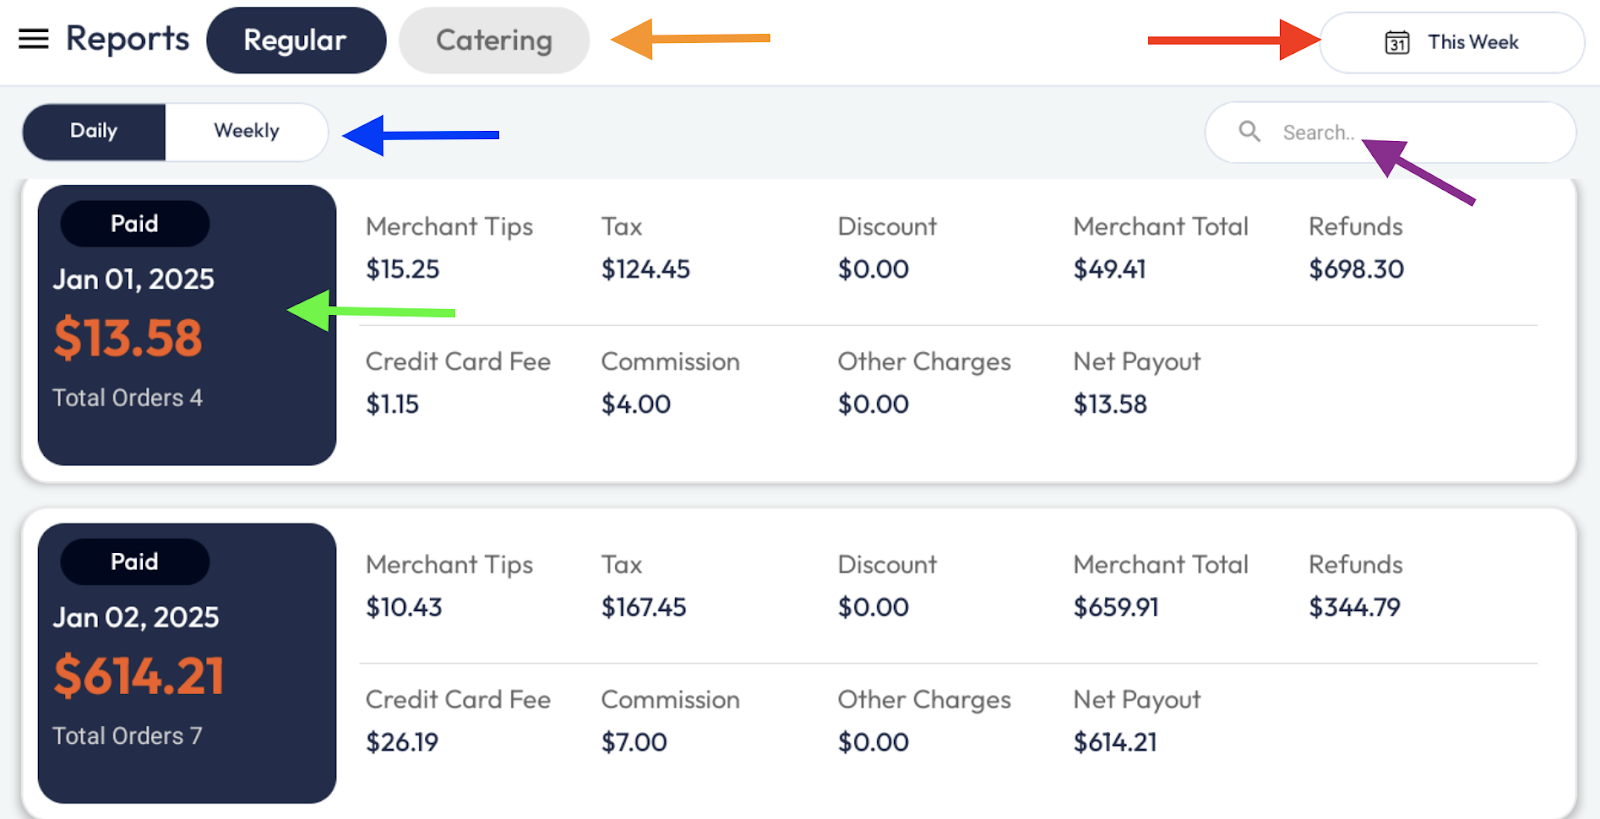
Regular / Catering: Switch between reports for your standard orders and catering orders. This helps you track earnings separately for each type of service.
Daily / Weekly: Toggle between daily and weekly views to see sales and payouts for a single day or summarized across an entire week.
Calendar: Use the date selector to view reports for a specific day, week, or date range, making it easy to check past performance.
Search: Quickly find reports for a specific date, order, or detail by typing keywords into the search bar.
Tap to see Full Report Orders:

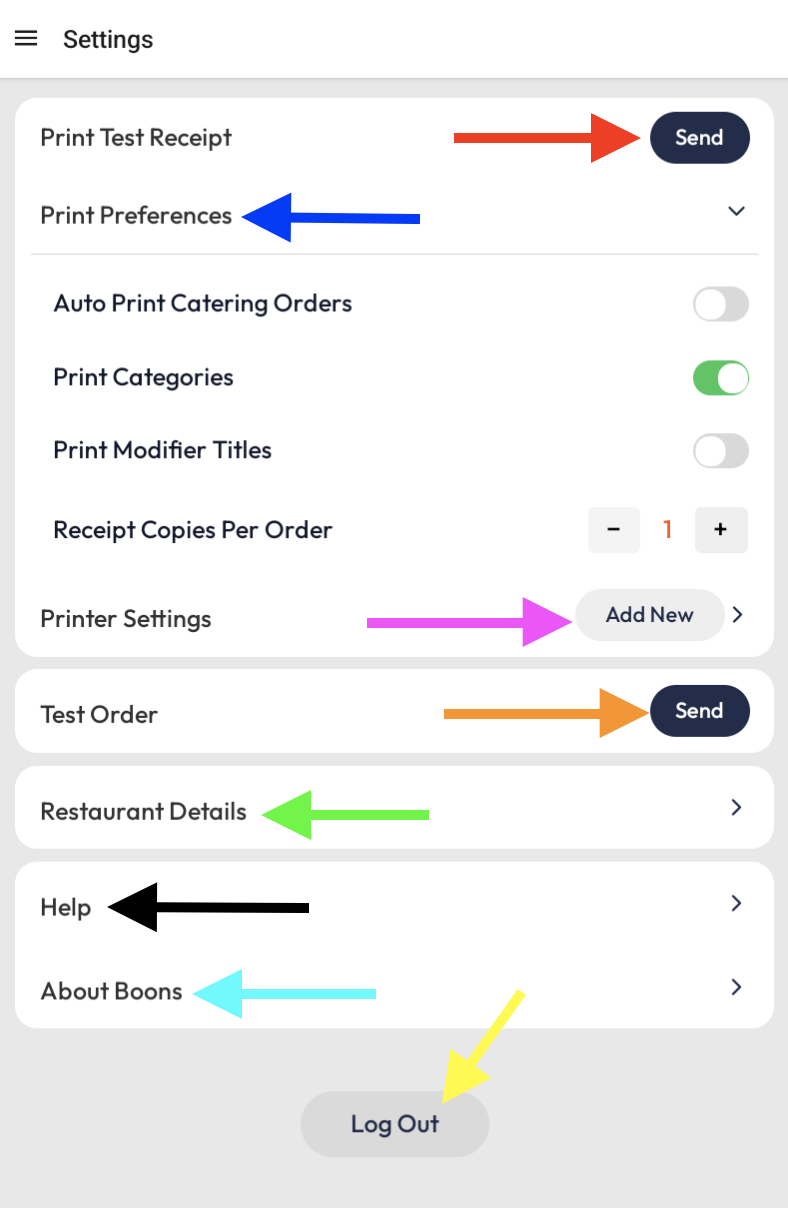
Print Test Receipt(Send):Sends a sample receipt to your connected printer to ensure it’s working correctly.
Print Preferences:Allows you to customize how your receipts are printed, such as which details you want displayed on receipt, and how many copies per order.
Printer Settings(Add New):Lets you connect and configure a new printer for your tablet.
Test Order(Send):Sends a fake/test order to the system so you can check how it appears and prints without affecting real customers.
Restaurant Details:Drop down displays the restaurant detail such as name, email, and phone number.
Help:Provides contact information if you need assistance.
About Boons: Shows information about the Boons platform, including version details and company info.
Log Out:Signs you out of the Boons Merchant app on the tablet.

Phone: Displays customers phone number and email address
Printer:Prints the order details for preparation or record-keeping.
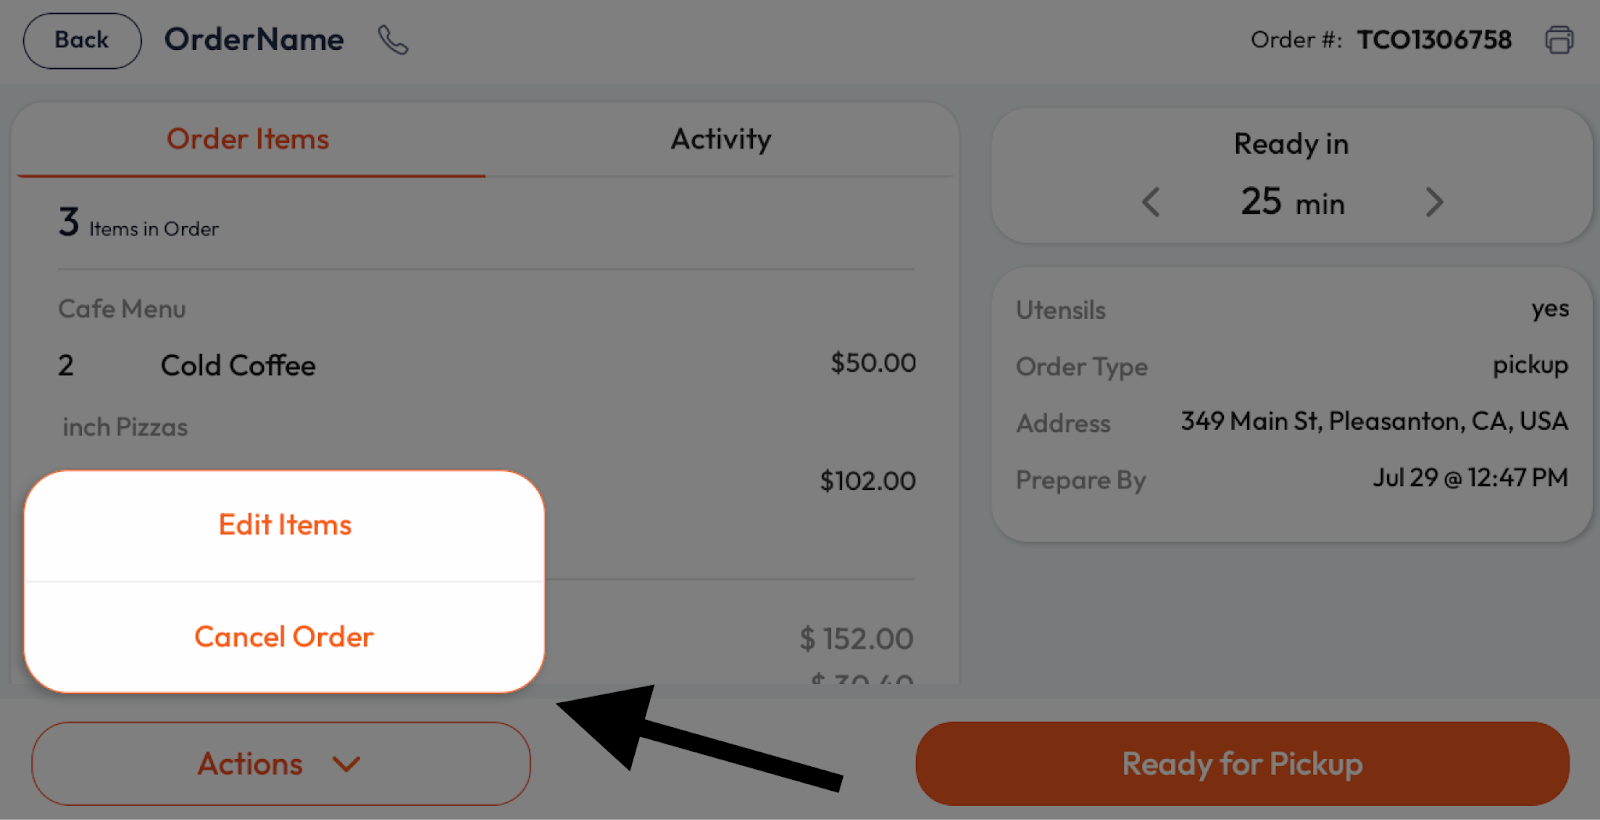
Order Items:Displays the list of items included in the customer’s order.
Activity:Shows the order’s progress timeline, including when it was placed, accepted, and started.
Actions:Opens additional options for managing the order, such as editing or canceling it.
Ready for Pickup:Marks the order as ready, sending a notification to the customer to collect it.
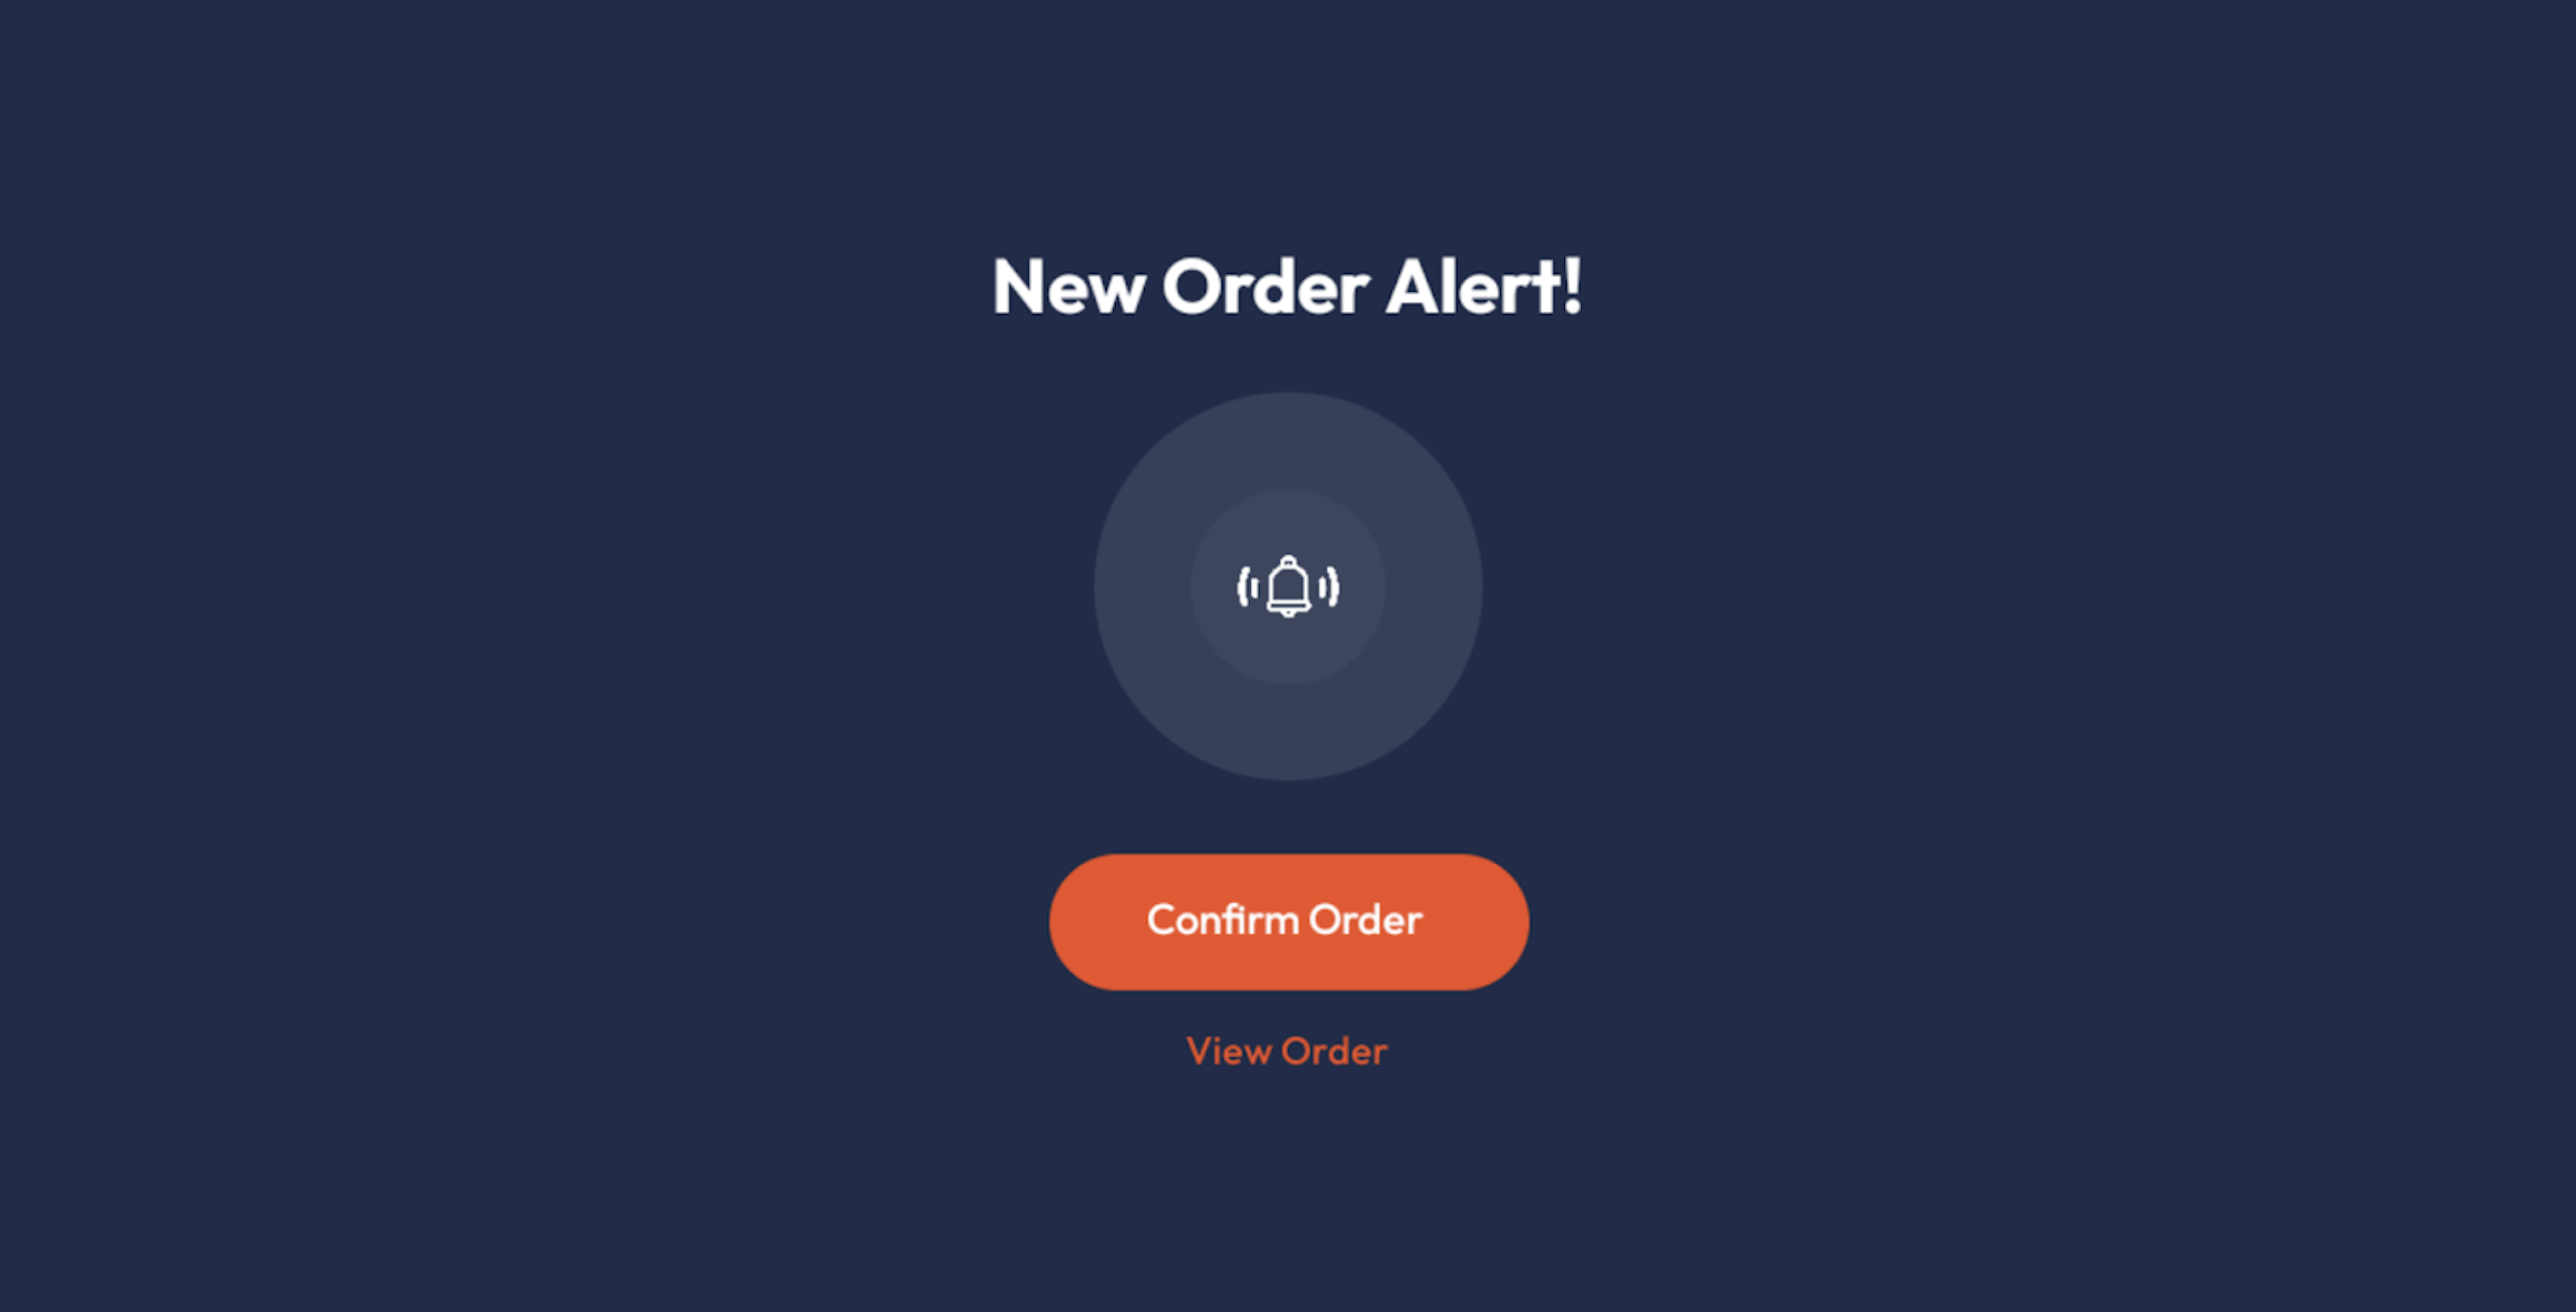
You’ll receive a real-time notification with a sound alert. The new order will appear in the “Dashboard” tab with customer details and items listed.
Once the order is prepared:
• Go to the Order.
• If it’s a pickup order, tap “Ready for Pickup.”
• If it’s a delivery order, tap “Ready for Delivery.”
All items unavailable:
• Tap on the order.
• Select “Actions”, then choose “Cancel” to cancel the entire order.
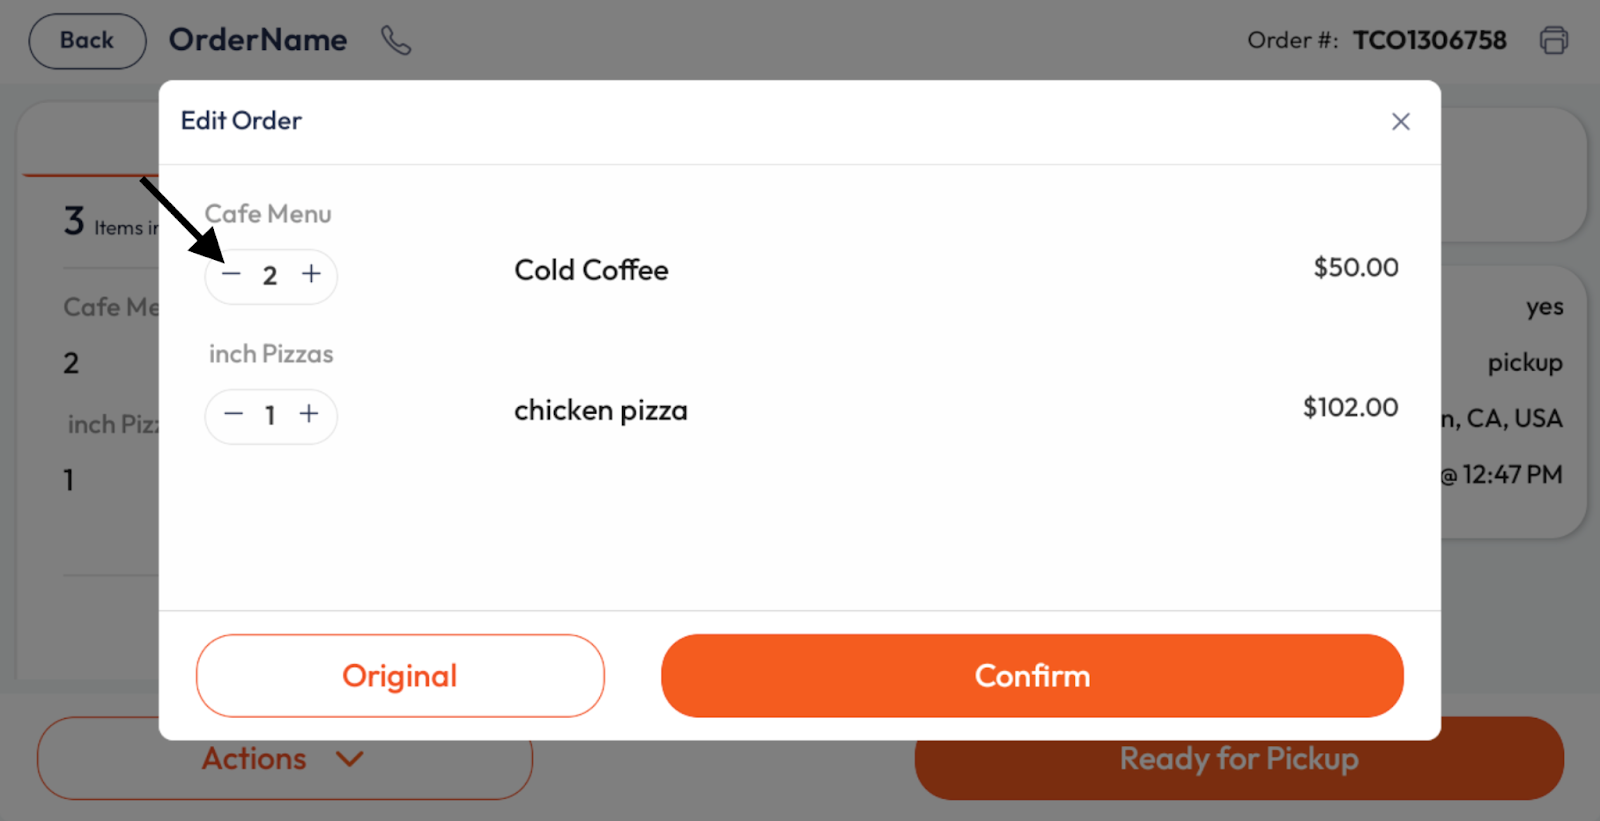
Some items unavailable:
• Tap on the order.
• Go to “Actions”, select “Edit Order”, and reduce the quantity of the unavailable items accordingly.

To manage menu item availability:
• Go to the Menu tab.
• Select the category where the item is located.
• Use the toggle switch next to the item to enable or disable it.
• Green toggle = Enabled
• White toggle = Disabled
To manage your store's availability:
Go to the Store Hours tab.
•To pause all new incoming orders, tap the toggle switch to stop accepting orders.

If you're not receiving orders, your tablet may be offline or turned off
Here are a few things you can check:
Phone: (925) 464-4430
Email: info@boons.io


